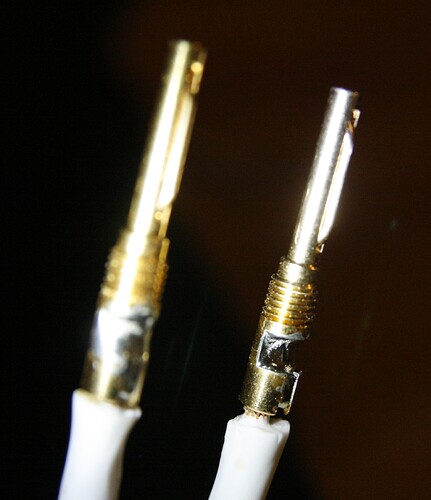
Mine have bent (the cable itself not the pins) over time from the weight of the cable but the soldering joints are still very robust. They started off straight at one point. Anyway the music is still magnificent and that’s what matters at the end of the day
Stephen, is visual inspection enough to ensure that connections are soldered properly? After reading some dreadful posts about termination problems, I decided to remove rubber protection and check visually my Naca5 termination. But I’m not sure if that would be enough to ensure that everything is properly soldered…
I’ve read some posts (in older forum and in other internet forums) about that people listened to music in a long period of time not knowing that their naca5 connections are soldered badly. And after re-terminating they were very impressed about the changes in sound quality and they never realized that their Naca5 can sound so good.
Is it a good idea to remove rubber protection (red and black) and check soldering quality? It is no problem to remove, of course, but I’m not sure if it is good idea to leave termination without rubber protection? Or maybe I can install new protection, but I haven’t done that before…
Hi Luc,
My advice here is if all sounds good and is well balanced from both speakers then I would leave well alone. You will need to put some heat shrink on both speaker plugs just in case they both touch whilst connected to you amplifier and or connecting to your speakers.
If you’re not happy with the soldering job then I would take your cables back to your or different dealer and explain to them what concerns you and can they possibly remake them up for you. I”m sure they will understand if you’re not happy with the previous work done.
For something like NACA5, yes. It is exactly how you inspect it.
The fact you keep referring to it as “rubber protection” suggests to me you haven’t done much soldering in the past. Be careful no to score the cable insulation or conductors themselves when removing.
Unless you have reason to believe there’s something wrong, I think a better idea would be to spend time away from anxiety-inducing Internet content.
This thread on the old forum used to contain some excellent photos of good and bad soldering on NACA5.
https://forums.naimaudio.com/topic.php?oid=1566878606552864&coid=159503632588889
Unfortunately the images are no longer visible, on my phone at least, and the link no longer works. Any chance of resurrecting this on the new forum FAQ @Richard.Dane ?
Yes, it’s on the to-do list. There was another thread on the new forum from a few months back that covered it and had some pictures too. I’ll try to find it later on.
Here we go…
The old FAQ had various examples of bad soldering alongside the good ones, which was useful for comparison, especially if you have limited experience of soldering.
Thanks to everyone. I think, it could be hard to check terminations by listening. Even if it sounds good to me I cannot be sure that they are good  . Maybe sound can be even better.
So I think I’ll remove “protections” (heat shrink tubes) and paste photos of soldering work here.
The expression ‘If it ain’t broken don’t fix it’ seems apposite here…
I will suggest to go to Peter Swain.
That last one is spectacular. I simply can’t understand how the requisite temperature is reached for the solder to flow so well, without impacting the insulation at all. My attempts look much more like the failed examples. But still better than what the dealer supplied.
A decent iron, 100 w + is a good starting point.
Yeah, you have to get that heat in there fast. Also pre-heating the pins, and the wood block likely helps hold that heat a fair bit. My iron is decent, (not sure of the wattage) but maybe I need to step it up some more. I’m kind-of inspired to have another go.
Get yourself some lead based solder. The lead free stuff is rubbish.
Yup, they do look good. The trick is to get a lot of heat in the plug quickly, before the insulation has a chance to really melt.
Making a wooden buck and ensuring that the strands are neatly slotted in place in the plugs and the cable strapped down to the buck allows you freedom of both hands to ensure the best soldering job. Make sure no solder runs over and down the plug - otherwise they will jam in the plastic casing - they need a bit movement to work properly and sound best. Likewise, you need to trim down any excess wire and solder with side cutters.
I like your opinion  . But how do you know if it is broken or not?
I think what you can do mathematically or physically (by measuring, doing visual inspection) – do it. What you can‘t – do by your ears, eyes, nose, etc…
Left speaker plugs:
Left amp plugs:
I’ll post photos of right cable shortly. Really not sure about amps end termination, looks not good to me…
Edit: Too late…


