Are there any official instructions on how to terminate Nac A5 with supplied Naim speaker plugs? Naim says, that it is very important to use supplied speaker plugs, but I can’t find official instructions on how to solder them.
Don‘t recommend dealer, they do not know how to do it correctly, at least in our country.
Naim are going to recommend dealers do it … fairly obvious
But if you use the search function (on the old forum) there is information there…from Richard Dane and others
As usual…it’s down to good preparation and cleaning of the parts. And a simple jig to hold the pins as you do the work.
There is only one way to solder cable connections & any trained service electrician / auto electrician / electronics / technician will know how. Instructions are not needed.
If your dealer is not able to do this (& thats a shame on them) ask them to recommend, or you yourself search for a service repair shop of the type listed above, they will have a large soldering iron of aprx 100W & use multi-core electrical solder. Personally (as its where I come from) I advise to look for an auto electrical service shop as they are used to working with cables of the size that is NACA5, whereas an electronics shop is not.
Thanks. So I’ll search for trained service electrician and give him instructions from archived forums (if I find them).
As for my dealer, I had in mind that I do not trust him, because I know, that soldering would be performed by a man with absolutely no knowledge of electricity and soldering. And after such service I never know if it was done correctly or not. And I’m sure, I would be the first person in our country ordering Nac A5 soldering :). So they are not the right persons to trust.
I had very bad situations with my dealer, and I understood that the only purpose they have is to take money from client.
Unfortunately there are no solder iron wattage or solder type recommendations in this forum link.
I use as 100 watt & 60/40 rosin multi-core for copper cable termination. Other lead % mixes work OK as do lead free, provided they are flux cored & specific for electrical connections & the soldering iron is powerful enough.
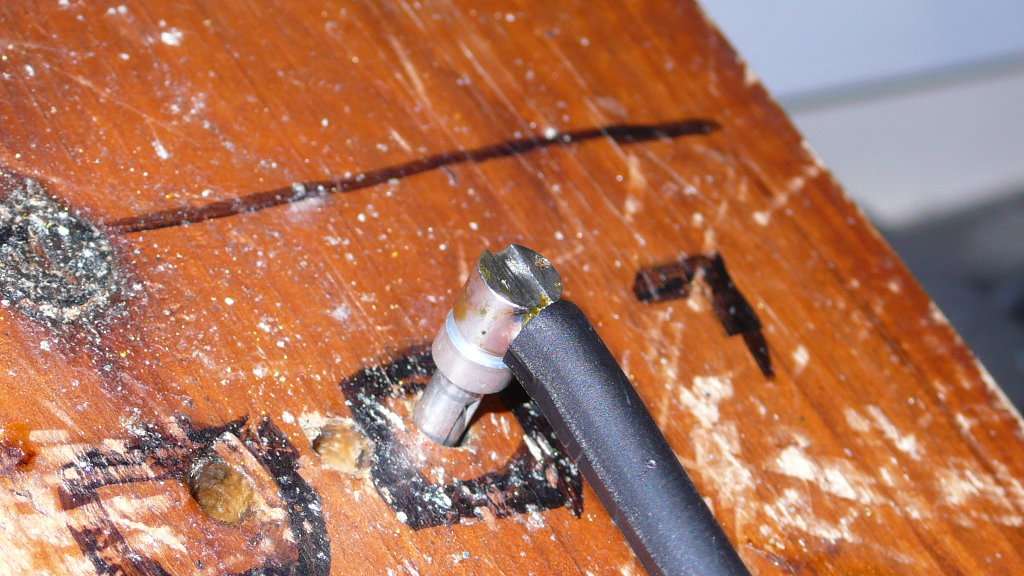
Agree regarding the wooden jig which I made from an off cut of 2 by 2 inch timber and held this in a desk vice. I simply drilled a couple of holes in the timber and pushed the plugs for soldering into this. As with an earlier reply I use a 100 watt soldering iron and ensure that the plugs are perfectly clean. Having said this a good dealer should do this for you.
@anon23139555 – May I respectfully say I don’t detect sarcasm here. It appears English isn’t Luc’s 1st language and this is a path of action for him. Like me, a soldering iron isn’t always a friend!
Best to use a plank of wood, drill a couple of suitable 4mm holes to hold the plugs in position, and use some kind of restraint (rubber band or other) to hold the NACA5 in position. Form the exposed copper ends so they perfectly fit inside the slot on the back end of the plugs. Then solder, ensuring heat is applied to plug and copper together. High heat is best for this to heat up the area quickly before the heat travels further down the copper and starts to melt the outer sheath of the cable. Be careful not to let solder run down the side of the plug - it will then jam the plug inside the plastic housing. Then trim off any excess with side cutters. The plugs should fit easily inside the plastic housing and should have a little bit of movement when manipulated.
It takes bit of practice so try out first with bit of old cable until you feel confident you can do a good job. Good luck.