I plan to use the same. How did you solve the problem of glue seeping into the top layer? A coat before gluing, or even cutting?
Thanks @Richieroo … will have a look at those … what’s holding you back? Go for it, can highly recommend it! ![]()
Cheers,
Mark
Great, I found building a test cabinet so valuable, both for confidence and figuring out techniques before the real thing.
I had the same problem sourcing materials, prices have gone through the roof ![]() 24 mm should be ideal for the speakers you’re building though, I’m sure they’ll benefit from it, and no need for the damping panels
24 mm should be ideal for the speakers you’re building though, I’m sure they’ll benefit from it, and no need for the damping panels ![]()
Looking forward to following your build!
Cheers,
Mark
A real shame Naim stopped building speakers … would love to hear these SBLs I keep reading about.
Cheers,
Mark
Agree, although a few things I now mostly know how not to do. Let’s see how my ideas for doing them different/better work out. Definitely gave me confidence.
I think so, but my worry is that it will turn it into a two man job. And as I’ll be renting a workshop it’s not easy to just leave something for a few days until someone has time to lend a hand.
I managed to mostly avoid it this time round, the glue spreads so much when clamped I found that applying it just along the centre of the joint only a minimal amount squeezes out which was wiped off with a damp cloth and sanded later. There needs to be a decent amount of glue so a bit of trial an error is involved.
Cheers,
Mark
Ah yes, I forgot the size of the speakers you’re building ![]() Hopefully there might be someone around to help occasionally.
Hopefully there might be someone around to help occasionally.
If your around south Gloucestershire anytime…
You’d be most welcome
Sorry to hear you had a crap year. I am really glad you eventually got round to building a pair of speakers though. I’m happy that I was a part of your inspiration. Most likely you will never be able to go back to shop bought speakers again now. You would have to pay a small fortune to beat those Illuminators!!
I am having some time with my small Scan Speak bookshelf speakers on my Nova at the moment. Im really enjoying them. I think I’ll build a pair of the Illuminators next. I’m beginning to think that having a number of different speakers on periodic rotation is a great way to stave off the upgrade bug!!
I guess storage space isn’t an issue where you live.
Thanks Mark, yes your build was a big inspiration… thank you! I’m very glad I got there in the end, even it’s a bit of a diversion ![]()
Your current setup looks great, giving the NDX2 and amp (can’t remember which one) a rest too?!
Hope you do do another build, which Illuminators do you have in mind? The 7751 looks really good ![]()
Cheers,
Mark
So to the build … I won’t post too many pictures of the first part as the process is pretty much the same as for the CNO cabinets above.
Back to using my trusty plunge saw, a table saw is on my wish list but no huge rush as this is still great for accurate cuts.
About to start routing the rebates for the rear panel and a removable bottom panel. The latter is so I can mount the crossover on it for easy access. Anticipating it not working first time maybe?! ![]()
Testing the fit of the panels so far.
After making the braces from MDF and routing rebates for them in the side panels it’s time to glue everything apart from the rear panel.
Rear panels glued.
The cabinets so far, starting to get a sense of their size.
Mark
Starting to get into uncharted territory now, routing the driver holes to fit the actual tweeters. They have tolerances in their diameter, 103.55mm ±0.2mm in this case ![]()
Trial run with MDF, starting with drilling holes for the tweeter terminals.
Followed by routing through the inner diameter, doesn’t have to be as accurate.
After many tests on scrap MDF to get the router set to the correct radius and depth the mounting area was routed.
Moment of truth … phew! ![]()
Repeated the process for the front panel. You can see how dense and fine the finish is on the Valchromat from the router base marks, easily sanded away.
Mark
Hi Martin, north Oxfordshire here, so not that far away … head to head comparison sometime maybe?! ![]()
Cheers,
Mark
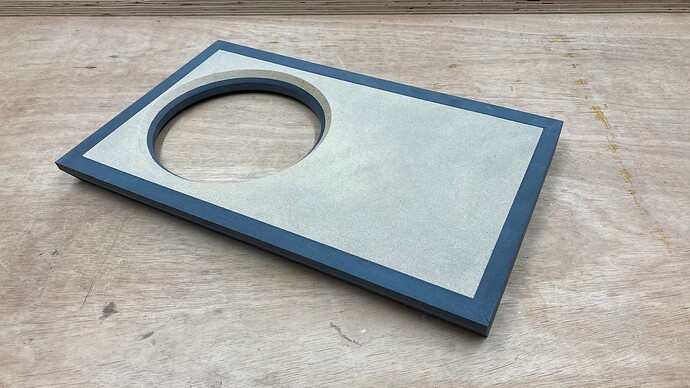
Continuing with the front panel. This is different to the way Troels built his, he used layered Baltic Birch to create a patterned effect to the tweeter area and I wanted a clean front with no joints visible in that area. So I decided to use the method that the CNOs use, two front panels that overlap, the difference here is that I needed to keep the cabinet volume exactly the same, so the inner area was routed out.
Last job for the inner front panel was routing a very small rebate around the back edges to give a shut line to the cabinet.
While I was working on the front panel I was glueing the thick bitumen damping panels with elastic flooring glue … gooey stuff!
That’s dad’s workbench there, a lot of sentimental memories, and I can see the oil stains on it from when I used it in my late teens early twenties when working on cars … he never complained
Mark
I wondered how you did that front panel! There’s a lot of good ideas spread across the cabinet designs, it’s an amazing resource really
Moving on to the front outer panel for the mid/bass driver … this is where I hit my first problems.
The cabinet drawings that came with the kit are slightly different from the ones on his site. He’s made the front panel thicker so it doesn’t need the slight tilt he was using originally for time alignment of the drivers. The problem for me was that I couldn’t get hold of thicker Valchromat.
After a lot of head scratching I remembered that I had some sheets of 6mm hard board (which is high density too) that if laminated with the Valchromat would bring it up to the required thickness, and if framed with strips of Valchromat shouldn’t be too visible.
The hard board and strips ready for glueing…
… and clamping overnight. The yellow sheets are the wax paper backing from the bitumen pads, used here to prevent glueing the wood on top to the panels … I never throw anything away that might be useful!
The front panel ready for trimming.
Next job was to route the driver holes for the mid/bass drivers. For some reason I had a lot of trouble with these compared to the tweeter holes. The router jig has seemed to have developed a bit of play and wasn’t making perfect circles. Luckily I had started routing undersize a fair bit, took a few attempts with tiny increments in radius and a steady pressure while turning to get an acceptable result. Not perfect though which is annoying but not too noticeable, will have to look into what’s going on there.
With the driver holes cut the framing strips were sanded flush by hand.
Chamfers routed to allow the drivers to “breathe”
The finished front panel. Quite a lot of work but pleased with the result.
Mark
It really is, picked up lots of very useful tips and info from reading a lot of the builds and articles on there, a gold mine of information for anyone interested in speakers and how they work really.
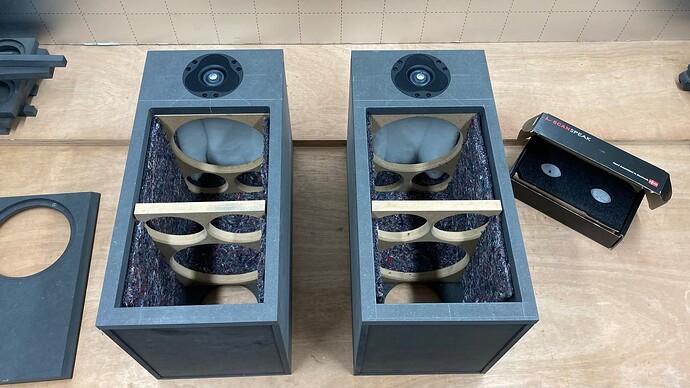
Onto the cabinet damping materials, felt lining cut to size…
… and glued using the same glue as the bitumen panels.
Acoustilux damping tack glued to the top of the cabinets, has to be done before the front panels are glued.
This shows how the inner front panel fits
When cutting out the middle of the front panel I’d forgotten that I need to add fillets for the bottom panel to sit against and screw into. Had to add in a section that the fillet at the front could be glued to. Glad I caught this before I glued the front panels on.
Mark
You never know, mostly German based, but we have a killer olive set up in the UK. You’ d be welcome of course


