There seems to have been an explosion in 3D printing technology over the last 10 years and we hear a lot from industries like car manufacturing, aeronautic design, the medical industry and even architecture and civil engineering. As far as I can determine, there are a few members here who are all ready engaged in a printing project of one type or another. So I was wondering if there were any chaps (or chapesses) on the Forum who could express their experiences and hobbies/projects with 3D printing. It would be really great if you could also post up some images of your prints and tell us about it/them.
I have considered using a 3D printer for architectural models but understand there is a size limit due to the size of the table/ printer - at least for the price range that I would be looking at, the hobbyist type around £500-1000 perhaps. Having said that, I also understand that it is possible to print a larger model in sections, but this throws up the issue of file complexity, what software one should use, file types, plastic composition, etc, etc.
I am sure this field is quite vast and interesting, I myself know next to nothing except a passing interest from an architectural model making perspective, so I thought tapping into the experiences and knowledge from those on the Forum would be interesting for all.
I kick off with this, apparently the Worlds largest 3D printed building in Dubai.
I have recently bought a 3D printer - a Tronxy x5s Pro - which is rather larger than the average at a similar cost to average. The smallest of them (which I bought, because the larger ones were unavailable at the time) has a bed that is 330mm by 330mm square, and can print up to 400mm high. It is well made (though I bought the kit, which you have to assemble. Takes time, but is not complicated). It seems to work - I have used only PLA, which is the commonest and cheapest filament, but not the strongest.
So far I have made a few things - some toys for my granddaughter, and a chess set for my daughter, plus a few things for myself, and am currently working on a design I have had for some years for a hifi rack. This is too large to print in one go, so will have to be glued together, which should be OK, but I have yet to get to this stage.
My experience is mixed. With this type of printer, there are layer lines - which makes the surface less pleasing than I would like. There are ways to hide this. Some suggest sanding and then filling with various materials, and finally painting. That works OK (I made a dice tower and sprayed it first with a filler paint, then with a stone spray paint (basically paint with bits (not stone) in it that looks like stone, a bit). The chess set needed quite a bit of fettling and final painting - you can get bits of plastic stringing out from the surface of the print.
Yesterday and the day before I was having terrible trouble with it - prints just weren’t working properly, and I had to scrap quite a few of them. The prints that I am doing at the moment look good so far, and I’m not entirely sure what is different.
The cost of the printer looks quite high (about £300 in my case), but the cost of filament will soon be greater (about £15 to £25 per kilo reel, depending on what it is). So not a cheap activity. But you can make things that otherwise would be quite difficult.
Which raises the question of what to make. There are websites that have free or paid-for designs of various things. Or you can use something like Fusion 360 or Tinkercad to make your own designs. This can be interesting and frustrating at the same time. Getting to know how to use these applications takes time and effort. I would have torn much of my hair out, had I not done so years ago. But again, it can be rewarding.
You also need what is called slicing software, which prepares your design for printing. It turns the design into a series of instructions in GCODE - instructions to tell the printer to move to certain locations, what temperature to put the bed or the extrusion nozzle etc. You can modify this quite easily if you wish using Notepad or some such text editor - but you would probably only make small edits.
Then there is the other technology - resin printers, using UV light to ‘cure’ a liquid resin to a solid form. These are generally rather smaller printers, rather messier and smellier, but do not suffer from layer lines as much, or at all. I have never used one, and would be reluctant to do so because of the mess and smell, but they do produce higher-quality items.
I checked out the Tronsxy X5SA Pro and it looks like a large format printer, 330x330x400mm, that would be suitable for producing prints for architectural purposes, and the price is around £450-500 not expensive for a printer this size. Looks like it would also need quite a bit of worktop space and after watching a video of a guy assembling it, it looks like it would take a day to complete for a novice like me. I guess for those that are not confident about assembling printers themselves a printer that comes more pre-built would be a good option.
I watched a couple of review videos, the first guy was not happy at all with the assembly process and it seems that he struggled to get the belts all square and consequently had poor printing results. The second guys video was much better actually and managed to assemble the printer very well, and of course had better printing results. I thought this guys instruction video was very good.
The guy first printed from the companies own files and he was quite critical of the finished item, he talked about the quality of the “slicing”. Then he printed from his own files with much better results. Am I correct in saying that the quality of the file will impact on the quality of the print…in some way?
Another issue was because the belts are so long, they started to stretch a little only after a couple of small prints, but after tightening them again, all was good.
So one or two things to consider straight away are size of the printer and ease of build. Obviously, this printer is considered ‘large format’ and would need a lot of space, if you are a home worker, like me, this could be an issue. Secondly, taking cue from your post and the assembly video, the build/assembly of the printer is vital as a default to achieve precise prints. A pre-built printer might be the way to go?
So far so good, next up the software/file formats and terminology. I shall go away a do some more investigations.
Thanks Alley-Cat. I saw a report where a company making snorkel masks were hacking it by producing 3D printed valves and parts to attach to it as a respirator. Not sure how realistic this was as they would surely need to be tested and certified for fit for purpose. But none the less, it shows 3D printing can be very adaptable.
Very much so - and I am still learning about this. The slicer that comes with the printer works well, I find - and you can tweak the settings. I have also used Ultimaker’s Cura 3 for slicing, and that works well.
The video you link to is a very good guide to assembling the printer - I used that to confirm that I was doing the right thing. I didn’t try to get it done as quickly as possible, but I think it took me 3 or 4 hours to build. I am, though, quite used to putting things together.
I didn’t have much trouble with this. One important thing is to ensure that the belts are properly and securely attached to the print head carriage.
Yes, of course it does take up a fair bit of space - the bed is 330 mm square, and there are, I would estimate, about 3 or 4 cm extra all round for the frame.
I think the price that you give is for the pre-built printer. The kit is smaller. Getting it built properly is not, though, very difficult. I used an engineer’s square to ensure that all the frame’s sides were at right-angles - though I’m not sure that is necessary, really, but thought I might as well. Leveling the bed is very important, but fairly easy to do.
What a refreshingly different, interesting thread. I have no 3D printer, nor any relevant experience, so nothing to contribute - but I have thought it looks like such a fun and potentially useful tool, and increasingly affordable, that one day I guess I’ll get one. This thread will make a good resource …and might prompt sooner rather than later!
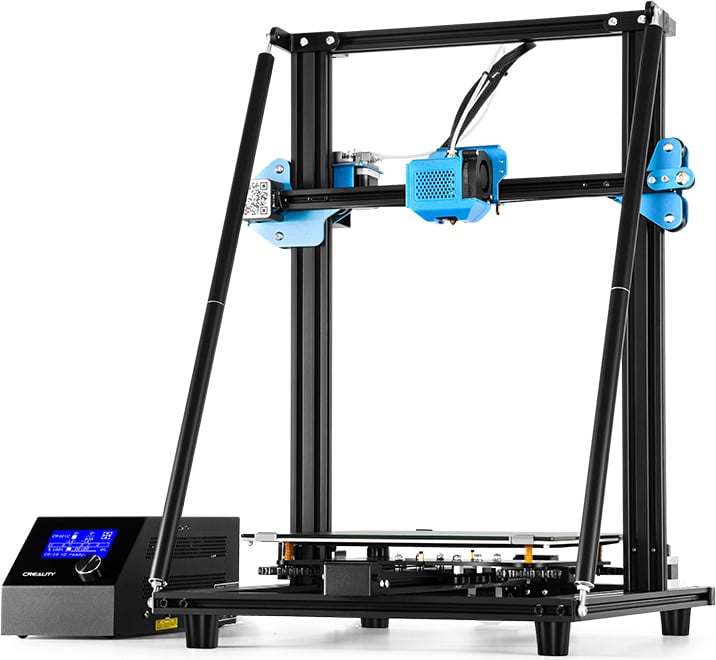
So checking out the internet for comparable printers to the Tronxy X5S Pro, I found the Creality CR-10 V2, which seems to be similar size and price, 300x300x400mm and $500. They are both designed and manufactured in China.
The Creality looks a lot easier to assemble with less componants but has a separate power supply/interface. I guess the overall footprint will be the same, but having a separate power supply on the worktop may mean eating more of that precious home working space.
The other important component with the product, probably critical for novices, is the support from the company and community. Another area to look into.
The crealty certainly has a good reputation. A little more expensive than the price I paid for Tronxy, and a little smaller print area, but there are lots more users of this one, and so more information on the web. I think (but haven’t checked) that more slicer software has this printer as one of the ones to select. Having said that, it is pretty easy to put the relevant parameters in for the Tronxy - mainly the bed size.
There is certainly a large selection of printers to choose from. Most seem to work adequately well.
The main problems I have is that it is a fairly expensive activity - at least it is for me at the moment, because I am currently developing a design, and am going through a fair amount of plastic filament as I refine what I’m doing. The other big problem is that it takes a long time to print anything of any size. Current print I am doing has taken about 2 days so far…
I guess I need several more printers…
The other thing that occurred to me last night was how much of a teaching and learning tool it can be for kids as well as adults. I have two young kids 7 and 5, and they would be ecstatic about making things…obviously the computer/file manipulation would be quite dull at this age, but in the future who knows where initial tinkering would result in.
Perhaps you could show an image of the print when its done as long as your not working on something Top Secret??
Time factor and material cost. I guess then, as with standard paper printers, one can check the cost per print or cost per weight of the filament material…also depending on the filament type???
Another hobby of mine is RC cars and there are loads of guys in that community who use 3D printing to make add ons and various parts that are now obsolete. I would say 99% of the guys use shapeways, basically they have the printers, you design something, put it on their website for everybody to see and if people buy as the designer you get a % of the sale but don’t have the big upfront cost of printers. I think it works really well, I have bought quite a few bits from designers/sellers on there and the quality of parts is top notch. As a designer all you need is the software on your PC but if only designing things for yourself you have to wait for them to be posted to you, rather than having it instantly.
It is a particularly long print time - at the other end of the scale I have had some things that take ‘only’ about an hour to print.
I’d be quite happy to put a picture up some time - though I might not be allowed to because it is a part of a hifi rack, which I might try to sell at some point. This is probably not really feasible, because at this rate I reckon it will take nearly a week to create one level of the rack! There are other possibilities such as using the print as a pattern and having it cast in metal - but while this would make it faster to produce, it would lose some of the advantages of printing it (e.g. vibration damping). I’ve done something like it before (using wood as the pattern, and casting in cast iron) which worked well, and it didn’t ring as I thought it might.
I could put up pictures of other things at some time, though.
Just checked the time that it has been running, and predicted time to finish - 38 hours!!
I have seen en passant various articles discussing ways to speed up printing which I will investigate. They include things like changing the fill pattern and amount (you never print things as solid blocks of plastic - there is no need and it would be horrendously expensive) and wall thickness etc. I don’t want to compromise the rigidity, but otherwise there may be ways that I can speed things up a little.
One thing I could put a picture of if you are interested is a mobile phone stand which integrates a wireless charger. It took several goes to get it right (the placement of the wireless charger is quite critical) but I’m quite pleased with the result.
There’s an article in Hi-Fi Choice which briefly mentions the idea of 3D printing for vinyl discs/records! Perhaps the future is sending out records as STL files!