
Hi I would like to adjust to 180grams, could somebody please give conclusive instructions on how to do it thank you so much.
I have the instructions but don’t feel that they accurate I’m a Newby to all this I would like help.
Remove the arm top. hold the bearing pillar between thumb and finger of one hand while loosening the grub screw that holds it in position with the other. Then adjust the arm pillar height a tiny amount. re-tighten grub screw to hold the pillar in place (do NOT over tighten - it should be done up just enough to hold the pillar in place but not tightened so it marks or damages the pillar). Place the arm top back on top of the arm pillar. Check VTA. Repeat as necessary until happy. Then check VTF and adjust as necessary. Check ant-skate bias and adjust as necessary.
n.b. It is possible to adjust from underneath but it takes some practice and it’s easy for the bearing pillar to drop out and be damaged, so I can’t recommend that.
1 Like
Thank you Richard, the grub screw for the pillar is The bit I’m having trouble with I’m not sure exactly where it is? I know i sound dumb…but i just can’t find it🙄
Oh now the V.F.A now that’s another thing I have no idea how to adjust.
Sorry you only need to tell me once.
Thank you.
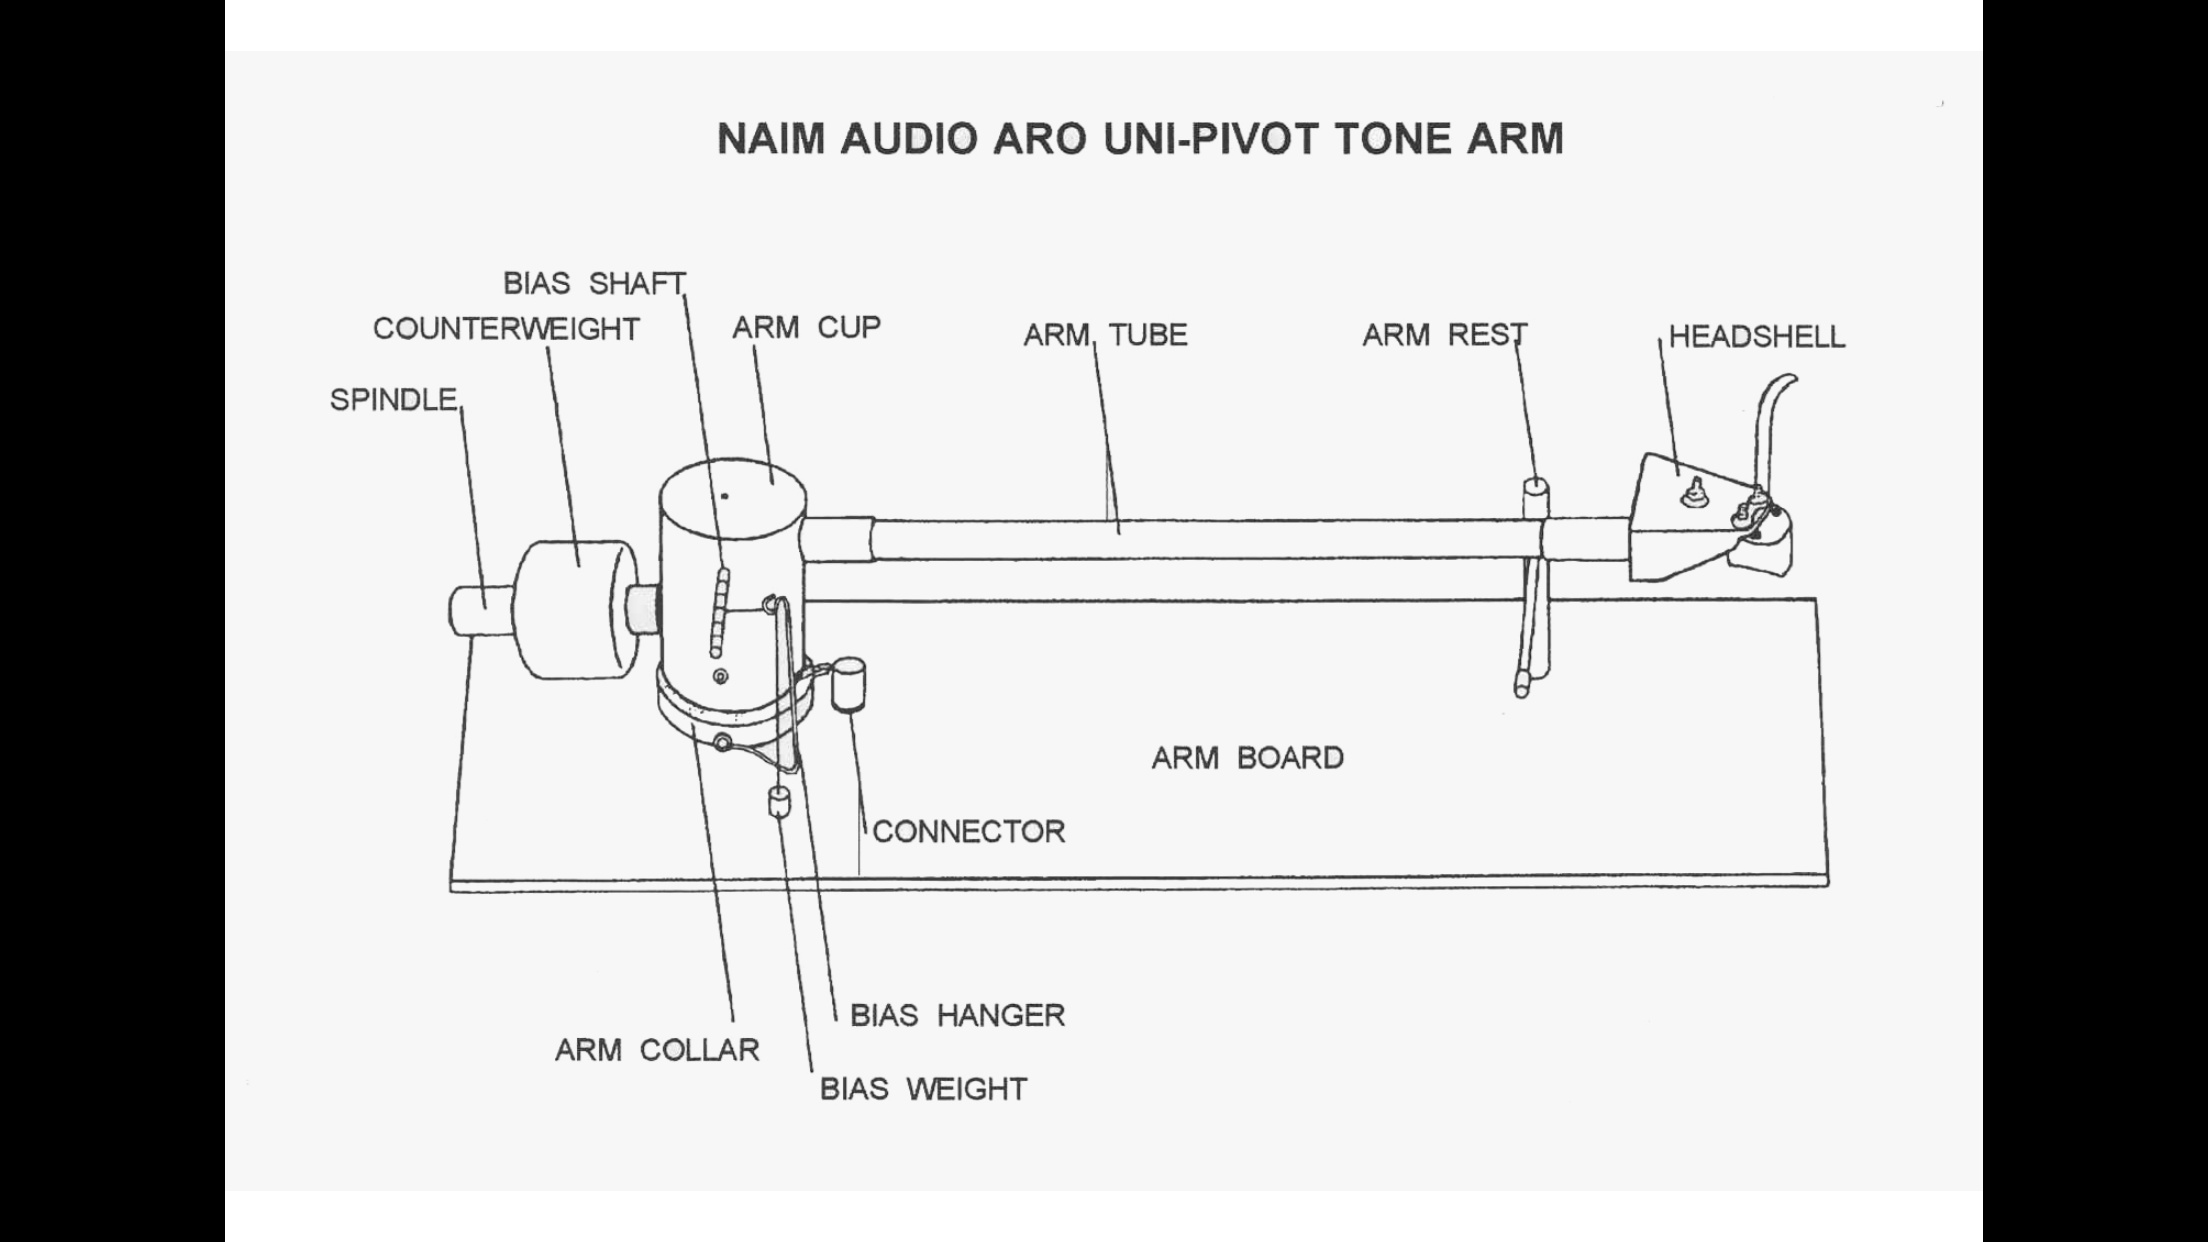
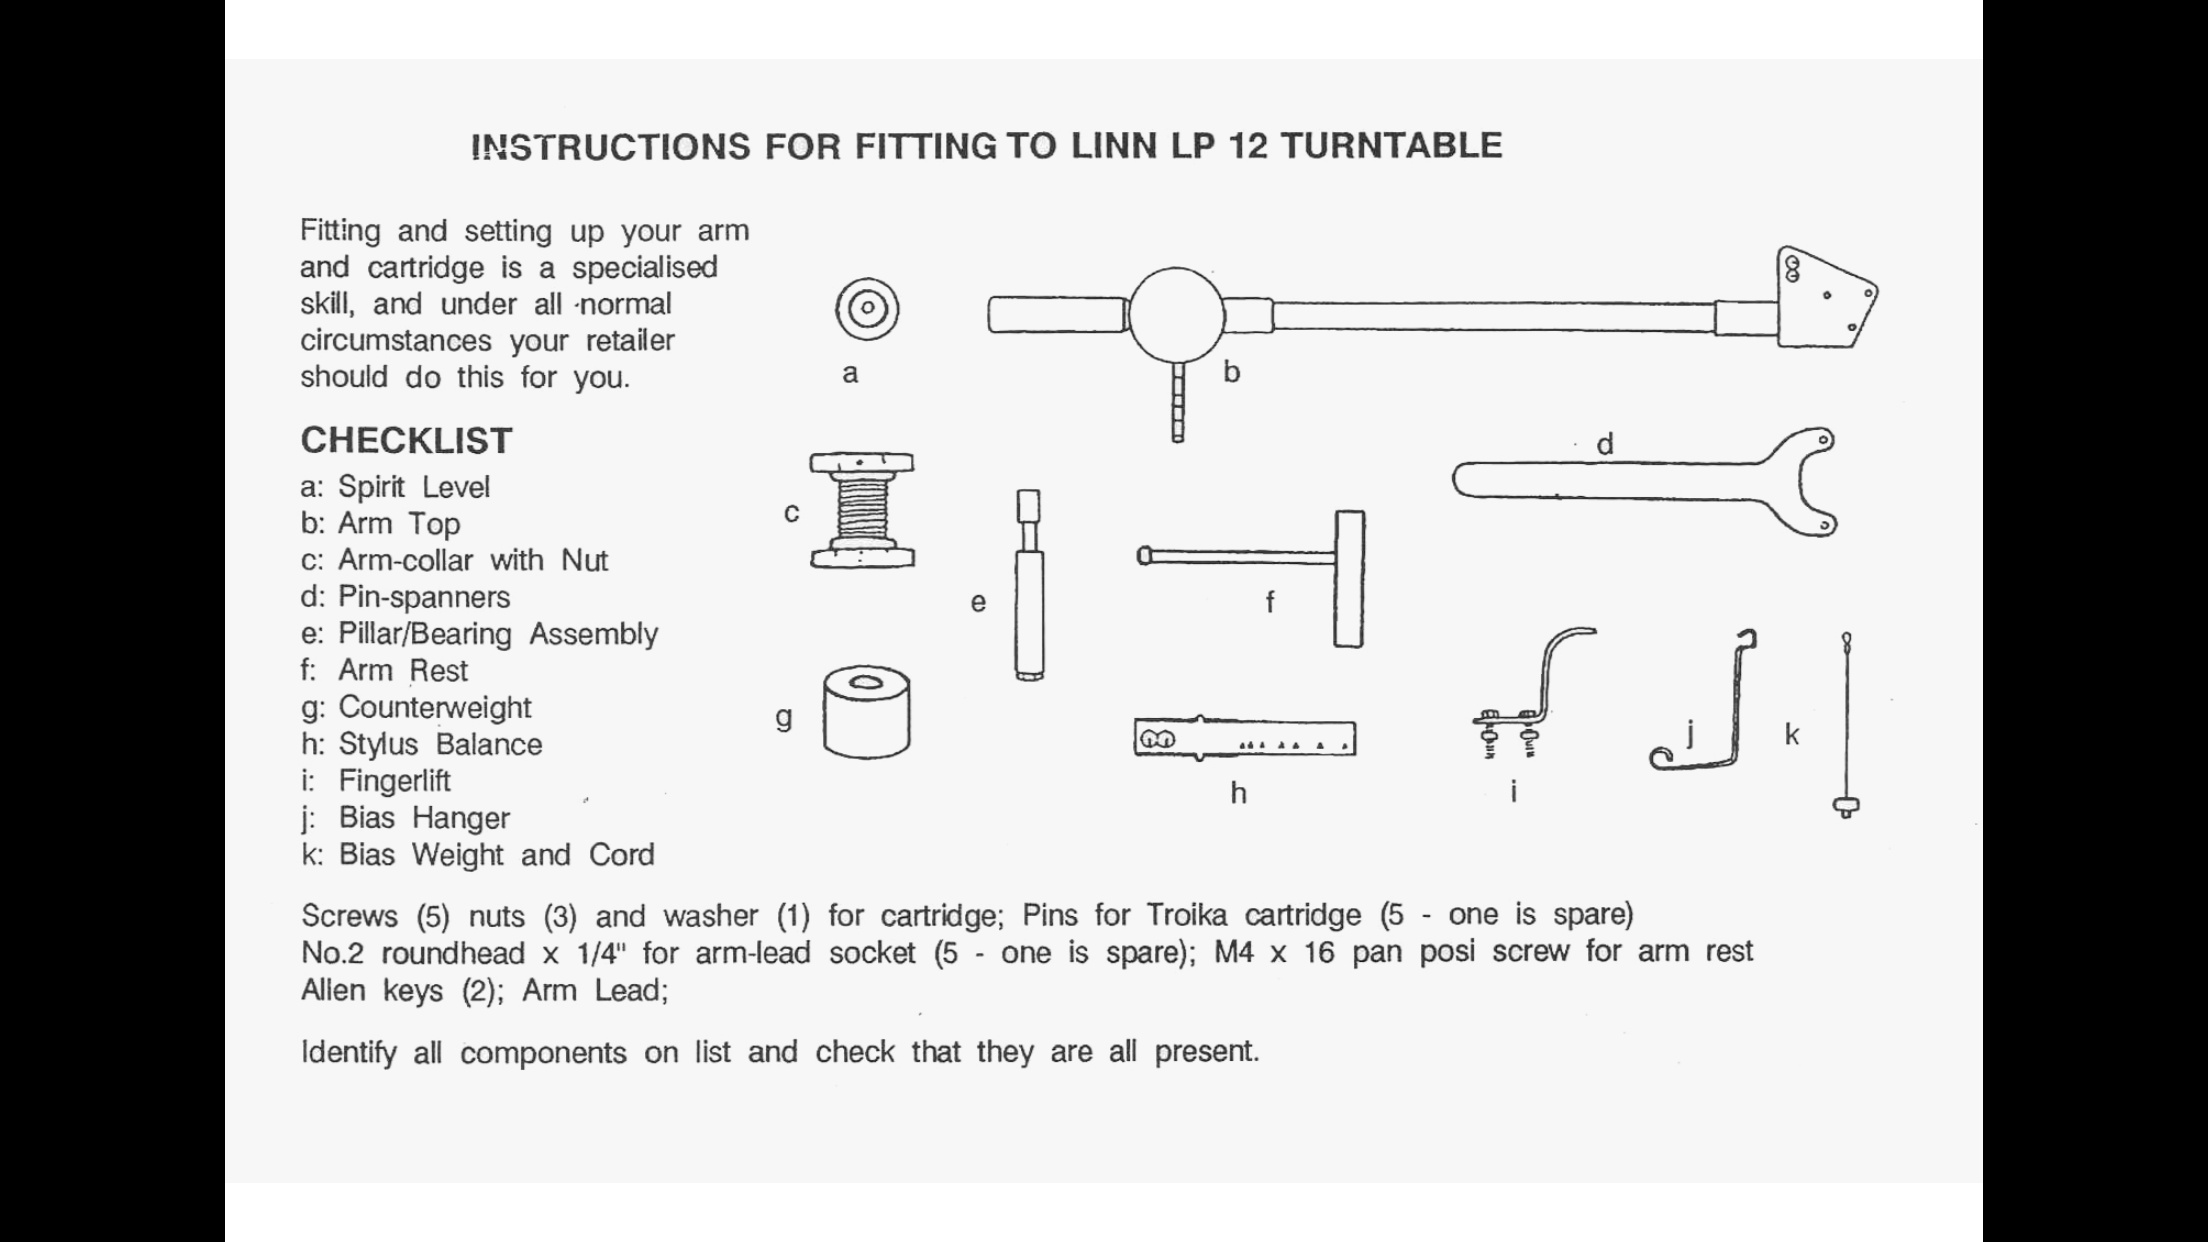
With the arm top removed take a business card and hold it against the pillar, flexing it slightly so it can touch the top of the bearing cup, mark it as close to the top of the cup as possible. This will give you a reference if you want to return to a previous setting. The simplest is to assume the cartridge is made perfectly and use the supplied bubble level to check VTA and azimuth. VTA is set by rotating the counterweight, there is a helical groove cut on its inside where a little sprung arm engages. Use the Ortofon balance supplied with the arm and read the Aro manual first for the correction factor, it’s not very precise and you have to have a Linn mat to remove but unless you can measure VTA at record height you won’t get an accurate reading from any gauge. Set VTF, azimuth and VTA as best you can then play some music. Finalise adjustment by ear, easy to say but it takes some practice to get the hang of. A pencil mark on the counterweight can help keep track but set azimuth first before making it, see below.
Measuring at a different but consistent height above the the record surface can still be useful to keep track too but the reading will be higher the higher the level it is made at.
The grubscrew is on the right as you look at the arm head on when it’s on its rest.
If the azimuth weight doesn’t allow you to achieve the correct setting because its too heavy for your cartridge’s weight distribution you may need to remove it. the counterweight stub can be rotated to change where the channel sits to make fine adjustments, bending the finger lift is also sometimes suggested as a last resort.
1 Like
Thank you, i’ll pluck up some Dutch courage and have a go😩
The grub screw is on the opposite side of the arm collar to where the bias weight is attached.
VTA = Vertical Tracking Angle, i.e. the angle at which the arm/cart/stylus meets the record. Moving the pillar up or down will alter the height of the pivot and thus the VTA. Note though that depending on how compliant the cartridge is, VTF will also have some affect on VTA (and vice versa). Most carts are designed to work best with VTA where the arm is essentially parallel to the LP. As a general rules, when VTA is set with the arm sloped slightly down towards the rear, the sound tends to become less bright and a bit heavier in the bass. Conversely when VTA is set so the arm sloped down towards the cartridge end, sound gets brighter. Note however that this is not a tone control as there will be other issues, and finding the perfect VTA can bring gains all-round. However, it’s best not to get too obsessive here; stick with parallel and you should be fine.
VTF = Vertical Tracking Force, i.e. the force exerted by the stylus on the LP grooves. This is usually a recommended range defined by the cartridge maker. You’ll need some stylus scales, but best fine tuned by ear. Note that depending on the compliance of the cartridge, VTA, will also have some affect on VTF (and vice versa).
1 Like
It can take weeks if not month to finalise but most discs will still sound good, just enjoy the music until something comes along doesn’t sound right. There’s an eighties Robert Plant album, Shaken n Stirred, that can sound really edgy when the arm’s too high at the back, it’s also, in its original pressing, rather thin vinyl so I use this quite often for my first stab at adjusting by ear. It not exactly his best work so I don’t mind wearing out its welcome.
1 Like
Don’t take the arm pillar apart. Keep it upright.
1 Like
This from CW, i believe there is a small air gap bubble inside providing a kind of cusion.
1 Like
Yes, whatever you do, don’t take the pillar apart. just loosen off the grub screw in the collar and move the pillar up or down in the collar, then do up the screw again.
There is a ball bearing and a damping lubricant in the arm pillar.
1 Like
Hi Soundsfaber,
just to be a little controversial, the arm height is not adjusted to compensate for differences in vinyl thickness. Rather, you’ll see that the stylus itself is ‘canted’ at a angle (it doesn’t point straight down). This should be to a standard angle that is shared with the record cutter stylus. I.e you are trying to match the two angles. Unfortunately, this is not a very standard standard. Cutting lathes have cutting angles all the way from the mid 20s of degrees to pretty much flat. In any case, this indicates that you can’t adjust it correctly without knowing what lathe was used to cut record. Also a bit of trigonometry would quickly show that a mm or two adjustment at the rear of the tonearm makes little difference to the business end. Hence I’d suggest you set the arm flat and leave it. If you want to tweak SRA, then adjust the tracking force up and down a little. Enjoy.
1 Like
Thank you all, you know what after the enlightening education  I’ve decide to leave it alone.
I brought the lp12 from The Real Music shop in Wellington. Richard as you recommended I had Chris change out the snaic to black (Free labour🥳) plus the RF mod was already done. Im very sure it’s one of Chris’s setups so best leave it alone as I’m sure it’s as good as it’s going get, I just wanted it to be 180grams bias.
Thank you so much to all that have spent the time to post, as I’ve learnt so much in just a few hours, so much in fact I know better to leave things alone.
Best not to be like where I work
“ if it’s works, let’s fix it!”
Best Regards
Yes I’ve read that thread, It’s hours and hours …like days of play time since I had the arm off, cheers mate for the heads up.
This topic was automatically closed 60 days after the last reply. New replies are no longer allowed.