Thank you Peter for the feedback. If I understand correctly, scenario 1 would be the best option. It is also technically the solution that is easiest to implement. At the windows, I plan to have curtains that reach down to the floor. I also have a thick, deep pile carpet that can help with absorption. I’ll try that out. At the back (behind the listening chair) I don’t have an idea yet. I think acoustic elements are an important idea. I plan to make a project entry at Vicoustics with the data of the room. It’s not expensive and will listen to what they recommend. I don’t want to line the whole room with acoustic elements. But at central spots I’m sure it will make sense. Nice sunday.
2 Likes
While a glass window is acoustically porous in relative terms (double glazed units less so of course), in my case putting an acoustic panel in front unquestionably made things better (and you can easily lift out of the way as needed).
I’d also hazard a guess that your speakers will want to come further forward in the room (than in the top diagram), as a lot of soundstage depth appears behind speakers, when better positioned.
In truth, all you can do is experiment and listen to what your ears like best.
Hi Wilfred, and you are very welcome ![]()
Your room response put into Amroc (room mode calculator):

I have assumed your ceiling height is 240 centrimetres
This displays a stacking of modes (oblique I believe) at around 100Hz, which is not dissimilar to mine, which due to a length of 6 metres suffered in the 80-90Hz. Your room actually performs better than mine, before I started the treatment journey. You should hear your 100Hz issue with a slight thickening (chestiness) on male vocal and bass lines in general. Although your Atom all things equal doesn’t pump as much energy into your room as a Naim Nap 500, where you tend to play your music a bit louder possibly (I personally can’t help myself ![]() ), you still have to do some treatment, if you want the best from your system.
), you still have to do some treatment, if you want the best from your system.
As for windows, patio doors in glass the following principles rule in my humble view:
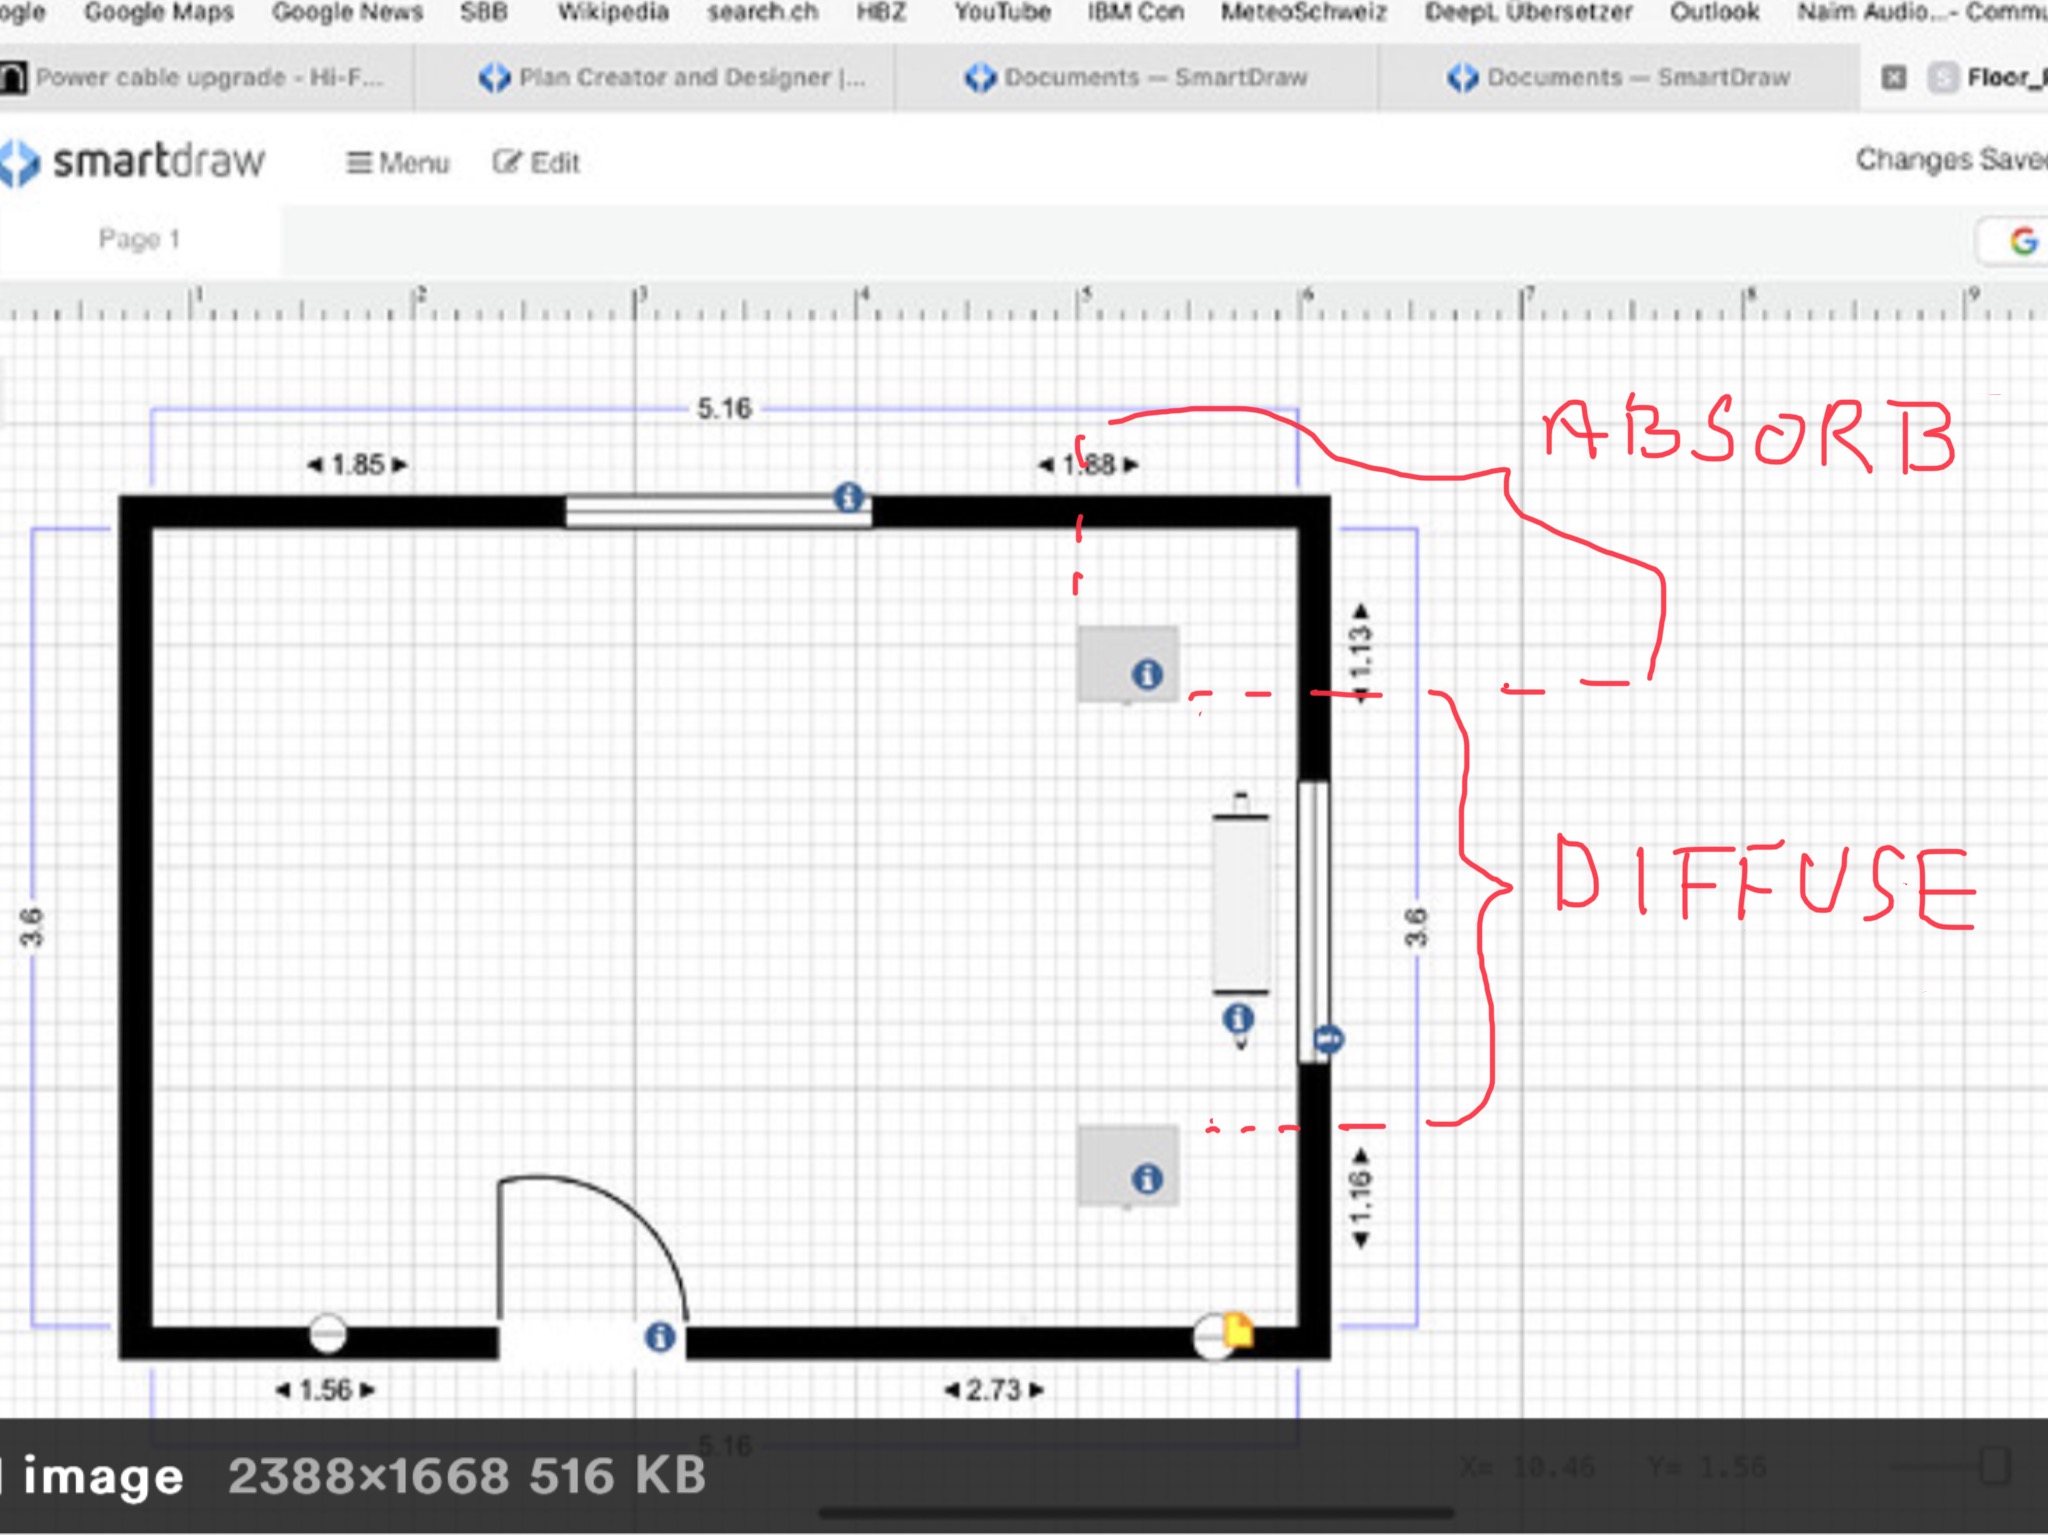
Try and avoid even heavy curtains in the area of DIFFUSION this assuming that your speaker front baffles are more than 90 centimetres from the front wall/glass. You may find that the shown area of diffusion in your case doesn’t actually need treating (as with my room), as long as the wall behind your listening position has been treated well.
Here is what I did to negate my 80-90 Hz issue (well partly):

My light curtains are hiding 100Hz tuned membrane absorbers, and the panels showing with the wooden patterned front are also helping, particularly the one in front of the speaker seems to take some of the energy out relevant to my problem.
I think on the whole getting Vicoustic on board with their skill and experience is a great idea. They are also very nice looking panels they manufacture. As always we get what we pay for ![]()
Don’t know if this helps a little but do enjoy the journey ![]() All the best Peter
All the best Peter
7 Likes
Wow @PeterR thanks you for the professional analysis. Yes, the room height is 2.40 metres. Then special curtains at the window behind the speakers are probably not necessary in the first step. And I’m glad that the starting position is not so bad. So I need absorbers in the left-hand corner and measures on the back wall behind the listening chair. What brand of absorbers do you use? And yes, the distance between the speakers and the wall behind is relatively variable, 90 cm would certainly be possible.
My windows are triple glazed units for better isolation. I will pay attention to that. And the distance of the speakers from the wall and the window behind is flexible. The room is not completely free at the moment. But the move should be possible next month. Before that, I’m planning the technical installations.
Hi Wilfried, sorry no my sketch was purely illustrational. When you do room treatment symmetry in a regular box shaped room is very important, ie you would need to treat both front corners equally. You may not need much, and as I’m not familiar with your speakers, I cannot guess how much energy they will pump into your room.
I have used GIK products and although not as trick looking as Vicoustic, they have worked well. GIK also offers an advice service, but if you are not on a strict budget, I would still choose Vicoustic.
A thought; if your window on your left looking from your future listening should cause a problem reflection wise, it would be quite easy to mitigate with a 60x60 combined absorption/scatter plate panel resting on the window ledge perhaps.
‘Symmetry’ rules the room treatment game in my view, as with speakers distance to sidewalls etc. ![]() Best Peter
Best Peter
Hi @PeterR, no problem, I already thought that the measures should be symmetrical on both sides. Thanks for the explanation. I will also look at GIK’s products and get a quote if necessary. Vicoustics seems to be the silver bullet. In the end, it will depend on how many panels and absorbers are actually needed, also on the wall behind the listening position.
1 Like
My room definitely works better with the speakers firing length ways. You will then have more flexibility with speaker and seating position. This will help with SBIR and ensuring you can avoid sitting close to any bass peaks or dips. You will also have more scope for side wall treatment for absorption but I would also consider some well placed diffusion. From what I understand diffusion is the icing on the cake once you get the correct amount of absorption. Something I would love to incorporate but as my room is also a living space it would be a step too far I think.
1 Like
A light touch is definitely key. And in many living rooms, the furniture provides enough.
I’ve mentioned on more threads than I can remember the perils of over egging room treatment. It’s the imperfections in the room that give the live in the room performance illusion. If you remove every imperfection by over treating the room, it just sounds like a gigantic pair of headphones. And while room distortions are removed and audible detail and clarity increases, you lose the sense of performance.
Given how expensive treatments can be, it is definitely better to add incrementally, and then pull back the second the room sounds over deadened for your taste.
4 Likes
Totally agree. Trying to achieve an even bass response without destroying the mids and highs is a tricky balancing act. There definitely needs some degree of reverberation.
I personally don’t like too much absorption on the front and rear walls (particularly the front wall).
I think absorbtion with diffusion on the rear wall would work best but I believe there needs to be a critical distance for it to work effectively.
It is a complex science combined with a large amount of subjectivity.
1 Like
An interesting read on why ‘Early reflections are not beneficial’
I do believe, @feeling_zen that space optimisation makes sense in principle. This is shown by the many posts here in the forum and by many photos in the System-Pics Theard. The post shared by @Folkman also makes this point credibly. I have no experience with this myself so far. However, I notice that my system (currently still in the living room) still doesn’t sound quite as good as the same system at my dealer, despite many optimisations. In the living room, I don’t have the possibility to do any acoustic measures, but I will tray it in the new room. But I also think that there are limits when a room is overdamped. I also see other limits. I also don’t want to completely line the new dedicated listening room with acoustic elements. In this video by Darko Audio(Click here) the optimum has probably been realised in collaboration with Vicoustics (@StuW: this is also a firing length ways approach….). But this is already beyond my aesthetic ideas in the field of room design and also beyond my financial possibilities (5‘000 Euros without installation…). I hope that Vicoustics and GIK will give me suggestions for different scenarios, not just expensive maximum solutions. I suppose there are also different levels with decreasing cost-benefit ratios.
1 Like
There’s a world of difference between a fully treated room and a room with some treatment where the latter is balanced to aesthetics and one’s own preferences and ears – and the latter includes what type of music you listen too and the nature of construction of your room e.g. whether it is stud (plasterboard) walls or dry-lined or basic brick/block.
Some of the room analysis models (which the likes of GIK have on their 'site) give an indicative wall coverage ratio for treatment, which can be scary in terms of what’s ‘required’ (often >35%) but, as others have said, you can address just the basic elements and see how things go e.g. start with corners and the basic reflection points – and this can be done inexpensively (in relative terms).
And, if you haven’t yet researched, panels are very much a DIY-fit (picture hooks and alike) or can even be freestanding on legs, so you can move them out of the way to maintain living convenience.
Thanks for the reference to the GIK analysis models. I will be happy to try that out and look at the different panel models. I am curious about the result and will report back.
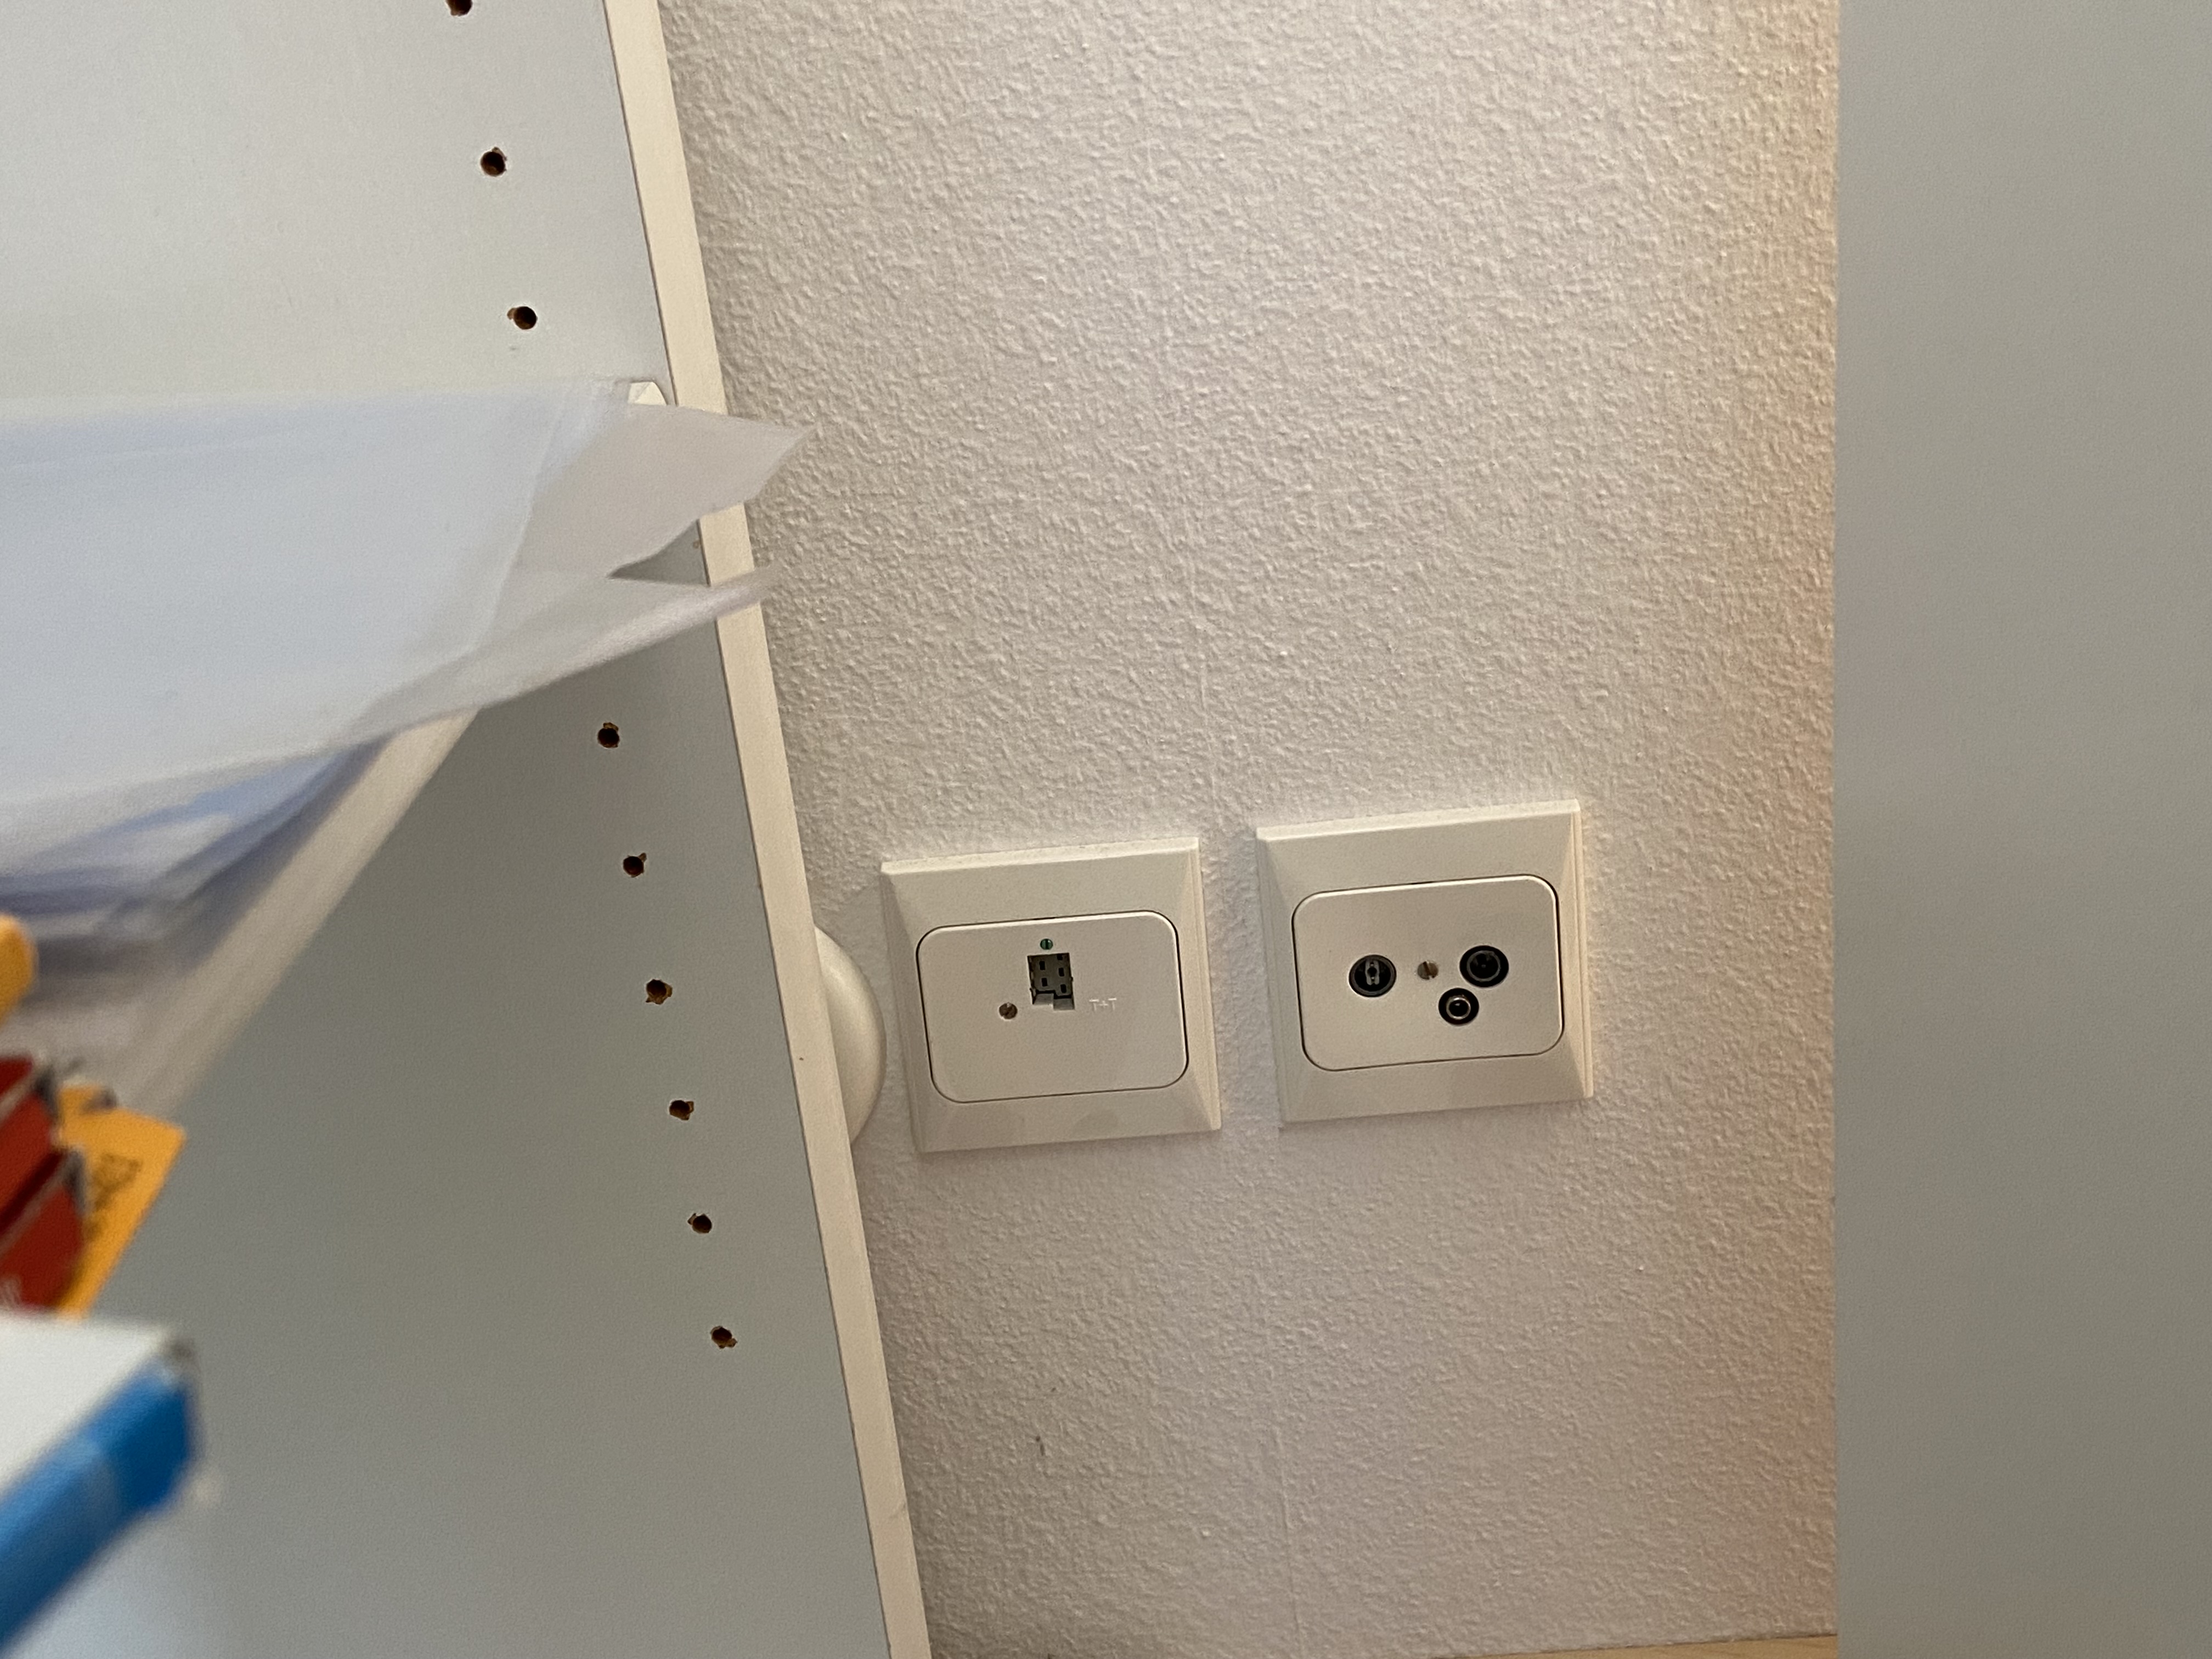
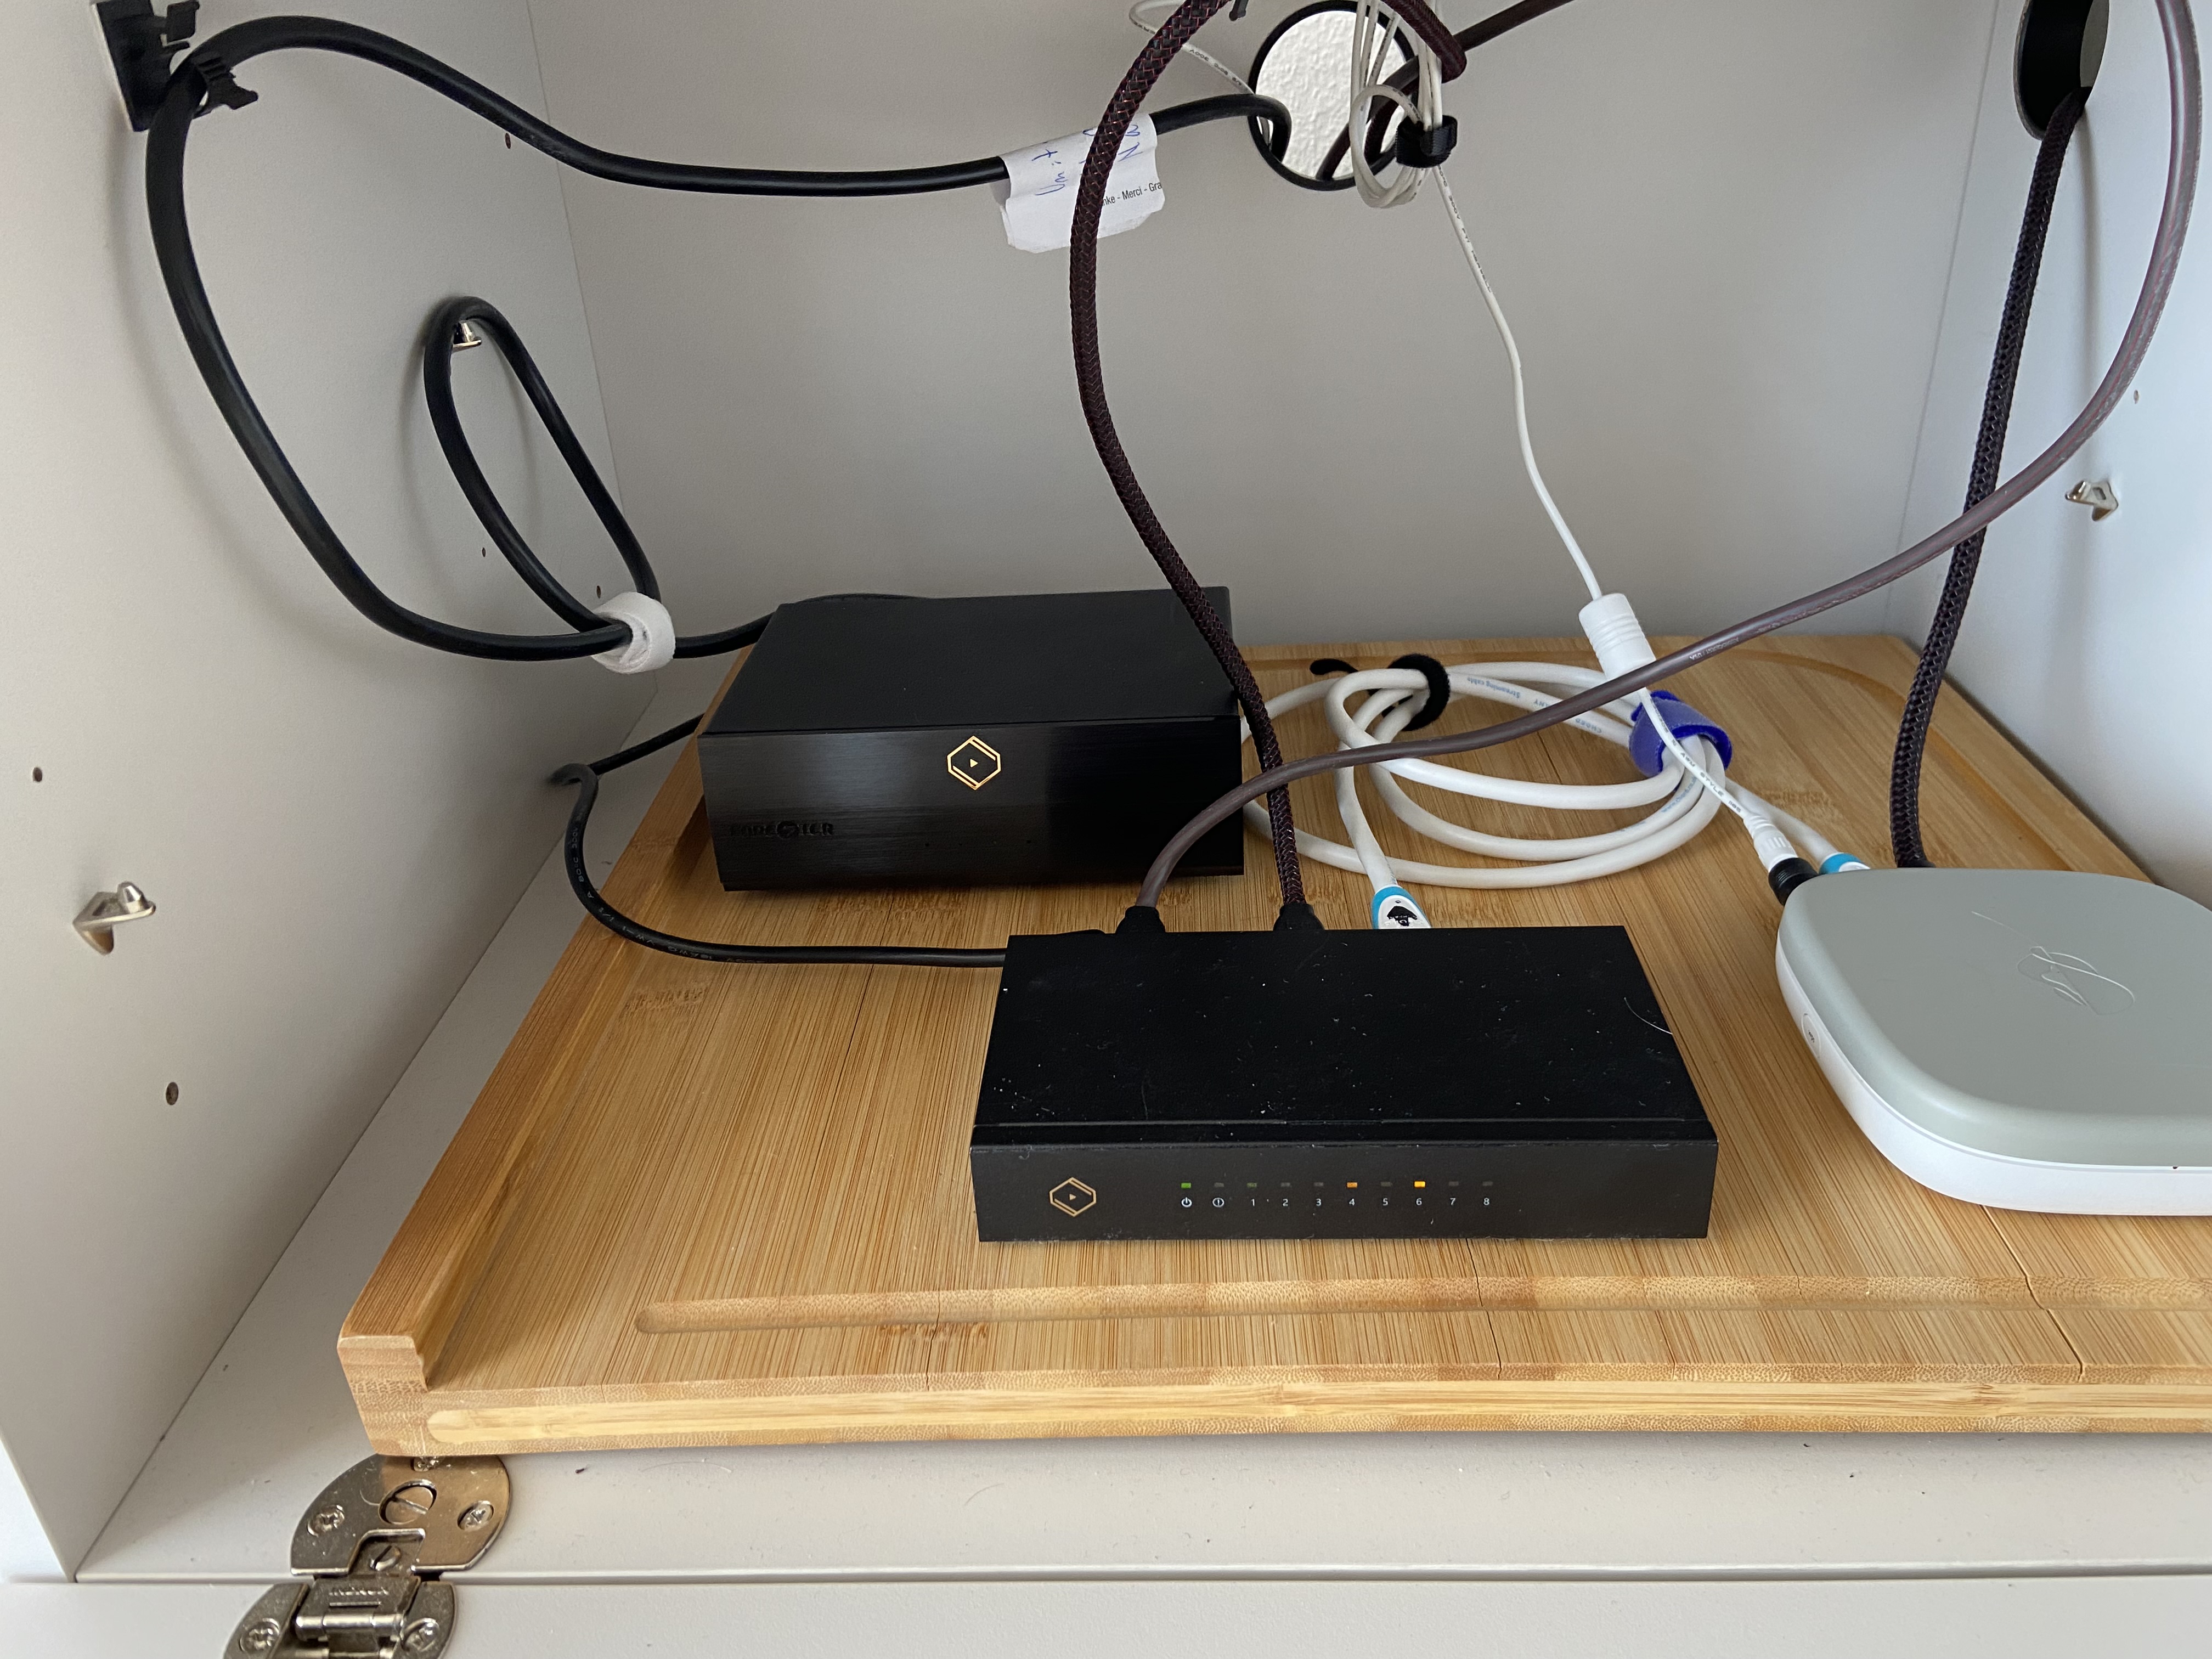
As described above, I plan to set up a dedicated listening room. The room is currently still being used as an office, but it will be refurbished. Currently. I use my system (actually in the living room) mostly for streaming via Quobuz. The newly planned room does not yet have an Ethernet connection. I plan to have an electrician install a connection to the Ethernet house wiring. There are telephone and cable TV connections that could be replaced by Ethernet. The router and switch are in the garage. I also want to continue using my second switch (Silent Angel Bonn F8 with Forrester F1) in front of the system (see photos below). Which in-wall Ethernet cables should I use? Are e.g. Bluejeans Bluejeans Cat 6a Jack-to-Jack, In-Wall Installable Cabling useful with the special Bluejeans Jacks? Or are there sensible alternatives? Without any special requests on my part, my electrician will use standard cables. Is this sufficient? I have found a lot on the forum about Ethernet cables, but nothing about in-wall cabling. Maybe our specialists @Simon-in-Suffolk @Mr.M have some advice on this - would be great.
My set-up:
- Garage in the basement:
- Router: XGS-PON WIFI 6 from swisscom (Swiss Telecom Company- Manufacturer: Arcadyan Technology Corp.) - powered by IFI iPower Elite 12V
- Cisco 3560 (standard mode with IGMP Snooping enabled)
(distributor for the entire house wiring to the upper floors incl. heating and solar system) - power cable to Cisco: Vovox Sonorus (s. Photo below)
- Dedicated Listening Room:
- Connection to Ethernet house wiring planned. There are existing telephone and TV connections (for 25 years now) that could be replaced (see photos below).
- Connection from Ethernet Wall Jack to Silent Angel Bonn F8 (with Forrester F1) and from Bonn F8 to streamer (I use Audioquest Cinnamon Ethernet cable). The Silent Angel Bonn is currently in the living room and will be moved with the system to the dedicated listening room.
Any advice is welcome, especially on the in-wall Ethernet cabling. Thanks in advance and have a great Sunday everyone.


If you are putting in structured Ethernet wiring (into the fabric of your house) if you can I would use trunking, such that you easily replace or add to cables/fibres should you need to.
However if not place carefully in the wall with some protection, perhaps behind skirting board… I do this.
As far as cable Cat 5e or or Cat 6 is fine and is good to upto 100 m at 1 Gbps. If you want quicker I would look to either port aggregation (multiple parallel runs into suitable equipment) or consider fibre or Cat 6A for twisted pair.
As far as connecting structured wiring… either learn how to do it with a RJ45 cable crimping tool, it’s not really difficult, or use an electrician to terminate the cables to the right lengths.
Patch leads come ready terminated for patching, structured wiring, ie wiring for the building, you typically terminate specific cable to suit the physical environment. The usual electrical / electronic wholesalers such as RS, Farnell and many others provide conformant structured cable to suit many different environments (you may be surprised how low cost this stuff actually is)
Think of switching like having a mains consumer unit with each radial or ring has its own switch from a core or distribution switch or switch ports on a router… you then run the switch ports from that switch to the sockets in a room or rooms, just like you would do mains sockets on a radial or ring.
I would consider PoE enabled switches for the edge so you can run wireless access points directly from the edge switch through your structured wiring… again this is what I do. These days you want to run most of your connectivity wirelessly, and ensure you have overlapping distribution of WAPs. I have a modest sized house and use three overlapping WAPs. Every where other than the garden (approx 4/5 acre) has good quality wifi including the patio with good hand off and load distribution.
1 Like
Whole Cat 5 and 6 data ports are fairly simple and often just a Female RJ45 round the back or PDT terminations, CAT6a has stricter requirements on how much can be stripped back and how many pluggable extensions. As such dedicated CAT6a ports are required that are nearly always a type of PDT termination that requires a special tool for the socket brand. I use Panasonic CAT6a wall ports with their little $2 tool. The plus side is that it is far easier than even the RJ45 crimping tool. For the other end where they all come together in your garage or cupboard, I highly recommend an RJ45 patch panel. They cost peanuts and again use PDT round the back which is so much easier and faster than crimping RJ45 and usually results in a superior quality port connection first try without any practice.
I say this from experience having crimped countless cables and also having 17 CAT6a feeds through trunking in a new home where I got the sparky to install the trunking and leave the rest to me.
1 Like
Only just getting to this after being away the weekend!
It’s worth selecting a known brand and doing a little thinking in to what cable construction you want to install and what termination types you’ll need.
I’ve got Excel cabling and termination jacks here, they also have tool less keystone jacks that clip neatly in to patch panels or faceplates.
I have links between switches that are 10Gb fibre (OM4 Multimode) including an outdoor run as it was the most suitable option in that case.
If you’re using screened cables they’ll need to be properly grounded all the way back to the common bonding point for the building. If you have low density cable runs over relatively short distances a starting point would be unscreened Cat6a (U/FTP), this does not require any Earth bonding and termination is simpler/quicker.
Also ensure you keep at least a 5 CM space on cable runs between the data cables and any mains cables.
Thank you @Simon-in-Suffolk @feeling_zen and @Mr.M for the valuable advice. I will discuss the points with my electrician:
- It doesn’t need boutique cables from the hi-fi shop. Good standard material will do. Excel cables are hard to get in Switzerland. However, there are many manufacturers and offers (e.g. at Digitec.ch ethernet 38ˋ000 products from over 100 manufacturers). They should be of a similar standard to Excel cables.
- Cat6 or at best Cat 6a, unshielded UTP, with PDT termination for 6a is sufficient. I am also asking for an RJ45 patch panel in the garage.
- It should be possible to use the existing in-wall cable ducts. The minimum distance of 5 cm from other cables should be taken into account.
- I already have good coverage (WIFI 6) with an access point in the living room that provides sufficient wifi capacity everywhere (e.g. for home office calls for my wife and me). However, as long as Naim does not favour the WLAN connection more (even the new Classic series does not show any new streaming technologies and only supports WIFI 5), the Ethernet variant seems to me to be the better variant (at least at the moment).
In the meantime, I have received the first proposal for optimising the room acoustics from GIK Acoustics. They recommend:
- The system should be placed against a narrow wall. The distance between the listening position and the rear wall (ideally 38% of the room length) would be larger and it would generate fewer room modes.
- The distance of the speakers from the back wall should be determined individually. This is essential at frist and it strongly depends on the speakers used.
- Room should start with the early & first reflection points on the side walls and ceiling (Click here). . They can be easily determined with the “mirror trick”. They should be treated with absorbers (in my case best freestanding on stands if the reflection points affect the door or window on the side wall).
- Room corners: I should use bass traps in each corner, preferably 2 per corner, so 8 in total. Placing bass traps in as many corners as possible will improve low end decay times, frequency response, and imaging.
- Back wall (behind the listening sofa): this is usually where large peaks and nulls occur, not only in the low end but in the mid and upper frequency range as well. A separate Monster Bass trap or (better) 2 impression panels (150 mm) with a wider absorption spectrum is recommended.
- Optionally, depending on the desired result (reverberation time), it would make sense to treat the front wall (opposite the listening position) and other points on the side walls. However, this depends on the practice and the placement of the speakers and would be a second step.
This illustration gives a basic idea (photo below). However, more bass trumpets and impression panels should be added to the rear wall. I seem to be a good support and I can understand the approach. It allows for a step-by-step expansion.

1 Like