How to build the Naim Fraim
The following guide is designed to allow you to build your Naim Fraim as quickly, easily and effectively as possible. More experienced Fraim users may have developed their own technique or order of build, but the end result should be the same as you would get from following this guide. I have tried to resist dwelling on some of the more “tweaky” aspects but have mentioned the ones I feel are important. Anything that is not absolutely essential I have marked as “optional”. I hope to eventually add pictures to enhance the guide further.
Part I – Building the Base
Start with the base. Open up the box and remove all the parts checking that all is complete. You should have;
1 x piece of glass.
2 x veneered levels
6 x large internally-threaded stainless steel cups
6 x stainless steel cup retainers
3 x short threaded rods
3 x very short threaded rods
9 x steel nuts
3 x short squat stainless steel spikes
3 x long stainless steel spikes
1 x stainless steel bar glass stop
3 x stainless steel ball holders
3 x mild steel balls
1 x pack of plastic “Fraim Protector” rings
1 x paper “Fraim Protector” template
1 x metal adhesive Naim logo
1 x 17mm spanner
1 x “Tommy” bar tool
Lay all the grouped parts out on the floor leaving enough space for you to build up the Fraim
Identify the top and bottom of each veneered level – the top will have cut-out indents for the ball holders and the glass stop
Prepare the 6 threaded steel cups by screwing in the threaded steel bars
Take one of the levels and turn it upside down so the top surface is plain and without indents. Insert one of the three long steel cup/threaded bars through one of the cut-out holes
Slide on a retainer from below and secure using one of the nuts. Tighten to the point of resistance then tighten about 1/8th of a turn further until you fear that the spanner will begin to deform. Repeat for each of the three legs
Screw on a second nut to each “leg” followed by the three long spikes. Do not tighten the second nut or the spikes at this point. Set aside the completed lower section of the base and position it where you wish the completed Fraim to stand
Take the second veneered level and ensure that it is right way up with the indents facing uppermost. Insert one of the three shorter steel cup/threaded bars through one of the cut out holes
Slide on a retainer from below and secure using one of the nuts. Tighten to the point of resistance then tighten about 1/8th of a turn further until you fear that the spanner will begin to deform. Repeat for each of the three legs
Screw on the short squat spikes and tighten using the supplied “tommy” bar
Place the top of the base level onto the already completed bottom level. The spikes should fit within the recesses in the cups. Try to ensure the spike tips are centralised within the cups
Fit the glass stop bar, the ball holders and balls to the top part of the base
Fit the glass on top of the balls making sure it is as evenly distributed as possible. (Optional: Tap the glass with your knuckle. Try this on both sides of the glass. One side will have a better “ring” to it than the other. Make sure this side is uppermost. If you do not get a “ring” – you’re looking for a “ding” rather than “donk” – then try turning the glass around back to front as well as rotating the steel balls in their cups)
Optional: use the supplied template to position the plastic “Fraim protectors”. If using the protectors you must ensure that they do not touch the balls.
Optional: attach the adhesive logo to the centre of the front edge of one of the veneered levels. Which one is up to you…
Level the base. Do not tighten up yet because you will do final levelling after the complete Fraim stack is built, however levelling the base as best as possible now should mean that the final levelling requires only very minor adjustment.
Part II – Building the levels
Open up the box and remove all the parts checking that all is complete. You should have;
1 x piece of glass.
1 x veneered level
3 x stainless steel threaded cups
3 x threaded steel rods (standard, intermediate or extended depending on type specified)
2 x narrow extruded aluminium legs (standard, intermediate or extended)
1 x wide extruded aluminium leg (standard, intermediate or extended)
3 x short squat stainless steel spikes
1 x stainless steel bar glass stop
3 x stainless steel ball holders
3 x mild steel balls
1 x pack of plastic “Fraim Protector” rings
1 x paper “Fraim Protector” template
Lay all the grouped parts out on the floor leaving enough space for you to build up the Fraim level
Prepare the 3 threaded steel cups by screwing in the threaded steel bars
With the veneered level upright with the indents facing uppermost, insert one of the three long steel cup/threaded bars through one of the cut-out holes
Slide on one of extruded aluminium legs, running the threaded rod through the center part and ensuring that the edge lines up with the edge of the veneered level. Note that the narrower legs go at the front and the wider one at the rear
Fix the leg into place by attaching one of the squat spikes and tightening with the “tommy” bar. When you tighten up ensure that the edges remain lined up with the veneered level. Repeat for all three legs
Place the level on top of the already positioned base. Ensure the spike tips are centered within the cup recesses. Attach the glass stop bar and the cups and balls
Fit the glass on top of the balls making sure it is as evenly distributed as possible. (Optional: Tap the glass with your knuckle. Try this on both sides of the glass. One side will have a better “ring” to it than the other. Make sure this side is uppermost. If you do not get a “ring” – you’re looking for a “ding” rather than “donk” – then try turning the glass around back to front as well as rotating the steel balls in their cups)
Optional: use the supplied template to position the plastic “Fraim protectors”. If using the protectors you must ensure that they do not touch the balls
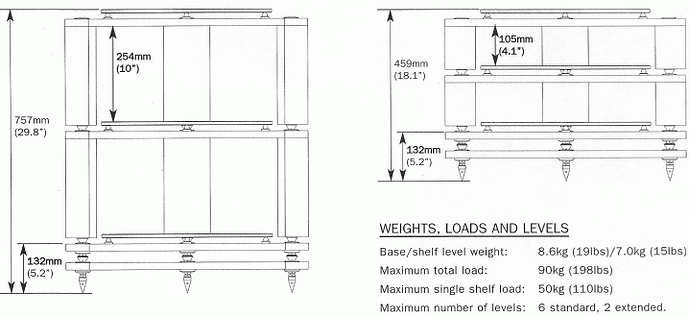
Repeat steps 1-9 for any further levels. Note that Naim recommend a maximum of 6 standard levels for each base. Turntables in particular perform best on a rack that’s fairly low. If you cannot achieve this then you may wish to use a wall mounted shelf. If you need further levels then you should start a new stack with another base. The height of an extended level is that of two standard levels, and two intermediate levels have the same height as three standard levels
Once the final level has been put into place you should do the final levelling. The top level is the one which most often has a turntable or CD head unit on it, so getting the glass as level as possible here is essential. With the aid of a good quality spirit level you should make the small adjustments needed by turning the floor spikes with the “tommy” bar to achieve this. Once you achieve a satisfactory level then tighten the spike retaining nuts by holding the spike in position with the “tommy” bar and tightening the nut with the supplied spanner
Fill each level with a piece of equipment. Make sure that the glass is re-centered after doing so. So long as the spikes on each level have been centered in the cups below, and unless you have the Fraim positioned on top of a compliant surface (not recommended), further levelling should not be necessary, even when fully loaded
Retain the spanner and “tommy” bar inside the base level box. This way, they will be there when you need to disassemble or move the Fraim in future. Store the boxes in a dry place.
Good luck! Richard